Unleash Your Creativity: A Step-by-Step Guide to Making a Whimsical Fairy Wreath with Hobby Lobby
Creating a whimsical fairy wreath is an enjoyable and creative project that can add charm and personality to your home or front door. This guide will walk you through the process step by step, using supplies and tools that are readily available at Hobby Lobby. The finished product will be a beautiful, delicate wreath inspired by fairies, flowers, and nature.
Supplies Needed
To begin, gather all the necessary materials for this project. These include:
-
Grapevine Wreath
-
Wood Signs with Jute Hangers
-
Sleeping Fairy
-
FolkArt Acrylic Paint in Ivory and Tea Rose colors
-
Extra Fine Glitter (1.8 ounces)
-
Twine (1/16″ thickness)
-
Soft Reindeer Moss in Light Green and Dark Green
-
Red & White Spotted Mushrooms
-
Floral Wire
-
Green Fern Bush
-
Boston Fern Bush (2 pieces)
-
Fields Daisy Spray
-
Bright Swallowtail Butterfly Embellishments
-
Daisy Flower Embellishments
You will also need the following tools:
-
Paintbrush and foam brush
-
Glue skillet
-
Glue gun
-
Wire cutters
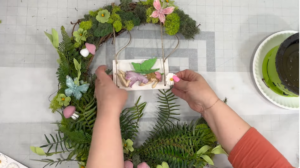
Step 1: Preparing the Fairy Swing
The first step involves creating the fairy swing, which will serve as a focal point for your wreath. Follow these instructions:
-
Remove the rope from the wood sign.
-
Drill holes into two corners of the wood sign where the swing ropes will attach.
-
Sand around the drilled holes if needed to smooth out rough edges.
-
Paint the wood sign using FolkArt Acrylic Paint in Ivory or Tea Rose colors, then let it dry completely.
-
Cut two pieces of jute string for the swing ropes. Feed one piece through two holes on one side of the wood sign and tie knots to secure it; repeat on the other side with another piece of jute string.
-
Attach the sleeping fairy figurine to the center of the painted wood using a combination of E6000 glue and hot glue.
Step 2: Painting and Glittering Mushrooms
To match your wreath’s aesthetic, customize your mushrooms as follows:
-
Lightly sand the tops of red-and-white spotted mushrooms to help paint adhere better.
-
Apply two coats of acrylic paint in your chosen color(s). While the second coat is still tacky, sprinkle extra fine glitter over each mushroom for a magical effect.
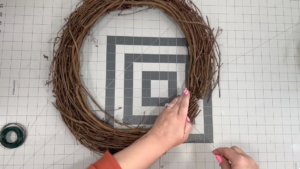
Step 3: Shaping Your Grapevine Wreath
To achieve a crescent shape for your wreath:
-
Use wire cutters to trim away about 9 inches from one section of your grapevine wreath.
-
Taper both ends by trimming branches at different lengths.
-
Securely wrap floral wire around each end to hold them together.
(Pro Tip: After gluing moss onto your wreath later, flip it over and tap gently on its back to remove any loose bits.)
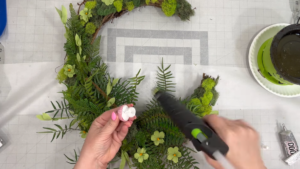
Step 4: Adding Moss as a Base Layer
Create depth and texture by applying moss as follows:
-
Use light green and dark green reindeer moss for variety.
-
Apply hot glue to small sections of your grapevine wreath at a time.
-
Press moss onto glued areas until you’ve covered as much or as little of the wreath as desired.
Step 5: Attaching Greenery Branches
Add greenery branches to enhance natural elements:
-
Position fern branches so they fan outward from both sides at the bottom of your wreath.
-
Glue stems into place within gaps in your grapevine base.
-
Add additional greenery sparingly along both sides for balance.
Step 6: Incorporating Daisies
Introduce dainty floral accents with daisies:
-
Clip off individual flowers and leaves from Fields Daisy Spray stems using wire cutters.
-
Attach flowers throughout your wreath by gluing their stems into crevices in the grapevine base.
-
Repeat this process with leaves for added color contrast.
Step 7: Securing Mushrooms and Fairy Swing
Now it’s time to attach key decorative elements:
-
Affix painted mushrooms securely using E6000 glue combined with hot glue; wrap chenille stems around fragile pieces if extra support is needed.
-
Tie jute swing ropes over top sections of your grapevine wreath so that they hang down into its center; adjust until level before knotting securely on both sides.
-
Flip over your wreath and use zip ties underneath to anchor swing ropes firmly; trim excess rope or zip tie ends.
Step 8: Adding Final Whimsical Touches
Complete your design with butterflies and additional embellishments:
-
Use bright swallowtail butterfly embellishments along with daisy flower decorations found in Hobby Lobby’s scrapbooking section.
-
Attach these items wherever desired using small dabs of hot glue.