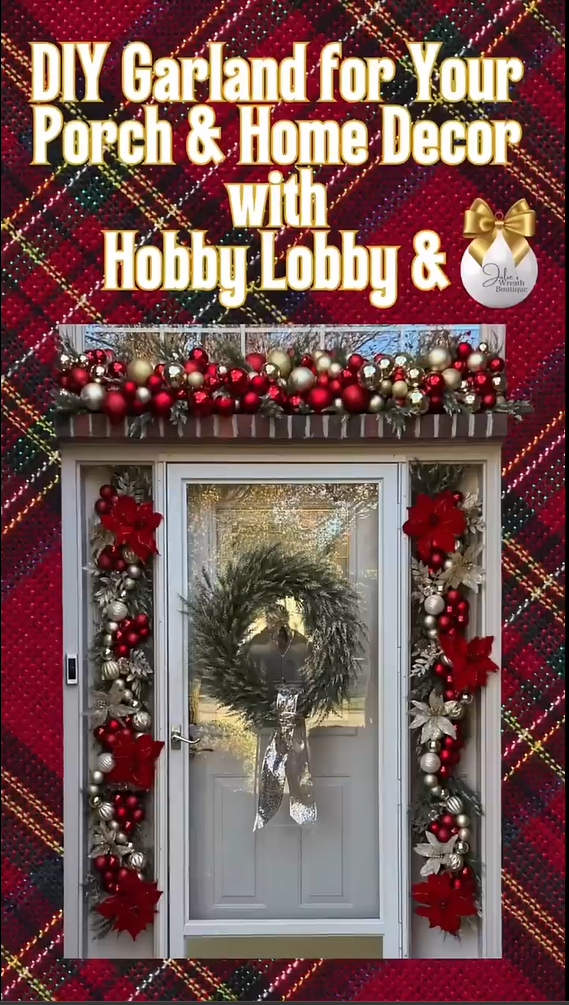
How to Make an Ornament Garland with Hobby Lobby & Julie’s Wreath Boutique
Creating an ornament garland is a fun and festive DIY project that can add a touch of holiday cheer to your home. With the guidance of resources like Hobby Lobby for supplies and Julie’s Wreath Boutique for techniques, you can create a beautiful and professional-looking garland. Below is a detailed step-by-step guide to making an ornament garland.
Step 1: Gather Your Supplies
To create an ornament garland, you’ll need the following materials:
-
Ornaments: Choose shatterproof ornaments in various sizes (small, medium, and large) and colors that match your holiday theme. You can find these at Hobby Lobby or other craft stores.
-
Garland Base: Use a sturdy base such as:
-
Pre-lit artificial greenery garland (optional for added texture).
-
Twine, jute rope, or heavy-duty string if you want a minimalist look.
-
-
Pipe Cleaners or Floral Wire: These will be used to attach ornaments securely.
-
Hot Glue Gun (Optional): For securing ornament caps to prevent them from detaching.
-
Ribbon or Decorative Picks (Optional): Add ribbons, bows, or decorative picks for extra flair.
-
Scissors/Wire Cutters: For trimming ribbon or wire as needed.
Step 2: Prepare Your Ornaments
Before assembling the garland:
-
Check each ornament’s cap to ensure it is secure. If any caps are loose, use hot glue to attach them firmly.
-
Separate ornaments by size and color so you can easily plan their placement on the garland.
Step 3: Create the Garland Base
If using twine or rope as your base:
-
Measure the desired length of your garland based on where you plan to hang it (mantel, staircase, doorway, etc.).
-
Leave extra length at both ends for tying or hanging.
If using pre-lit greenery:
-
Fluff out the branches of the greenery garland to make it look fuller before attaching ornaments.
Step 4: Attach Ornaments
There are two main methods for attaching ornaments:
Method 1: Using Pipe Cleaners/Floral Wire
-
Thread a pipe cleaner through the loop of an ornament cap.
-
Twist the pipe cleaner tightly around the base material (rope, twine, or greenery).
-
Repeat this process with different-sized ornaments, alternating colors and sizes for visual interest.
Method 2: Stringing Ornaments Directly
-
If using twine or rope as your base without greenery:
-
Slide ornaments directly onto the twine through their loops.
-
Tie knots between each ornament to keep them spaced evenly and prevent sliding.
-
For both methods:
-
Start with larger ornaments first to create a foundation.
-
Fill in gaps with smaller ornaments until the garland looks full and balanced.
Step 5: Add Decorative Elements
To enhance your ornament garland:
-
Tie bows made from wired ribbon at intervals along the garland.
-
Insert decorative picks (such as holly berries, pinecones, or faux snowflakes) into empty spaces for added texture.
-
Use hot glue sparingly if necessary to secure additional elements in place.
Step 6: Hang Your Ornament Garland
Once complete:
-
Use hooks, nails, or command strips to hang your finished garland securely in its desired location.
-
Adjust any ornaments or decorations as needed after hanging.
Tips from Julie’s Wreath Boutique
Julie’s Wreath Boutique often emphasizes creativity and personalization in her tutorials:
-
Mix textures by combining matte-finish ornaments with shiny ones.
-
Use themed colors like red-and-gold for traditional decor or blue-and-silver for winter wonderlands.
-
Keep proportions balanced by clustering small ornaments around larger ones rather than spacing everything evenly.